Google CTF 2023 - myTLS
During the Google CTF 2023, my college and I encountered a fascinating challenge which was TLS themed. The task at hand involved exploiting files writes, hashes and signatures.
This writeup is intended to walk you thought he process of how we solve the challenge and is also going to provide an overview of the challenge.
If you are only interested in the solution just skip to the Exploit section.

Challenge description
I implemented my own mTLS. It supports forward secrecy and it should be faster than yours!
Files:
Dockerfile
admin-ecdhcert.pem
ca-crt.pem
guest-ecdhcert.pem
guest-ecdhkey.pem
server-ecdhcert.pem
server.py
start.sh
Challenge overview
We have a python file server.py along with several pem files and start.sh, Dockerfile for local deployment.
We can split the program into two parts:
- “TLS” communication establishment
- File storage functionality
“TLS” communication establishment
The communication between the client and server is established using a custom TLS type implementation, which incorporates a Certificate Authority (CA). To initiate a conversation, the user needs to provide the following information:
- Certificate Signed by the CA (we can use the
guest-ecdhcert.pem) - Ephemeral client random (any 16 byte random number will suffice)
- Public key (
guest-ecdhkey.pem)
Upon providing this information, the server responds with:
- Server certificate (which we already have
server-ecdhcert.pem) - Server ephemeral random
- Server public key (we do NOT however have the private key
server-ecdhkey.pem)
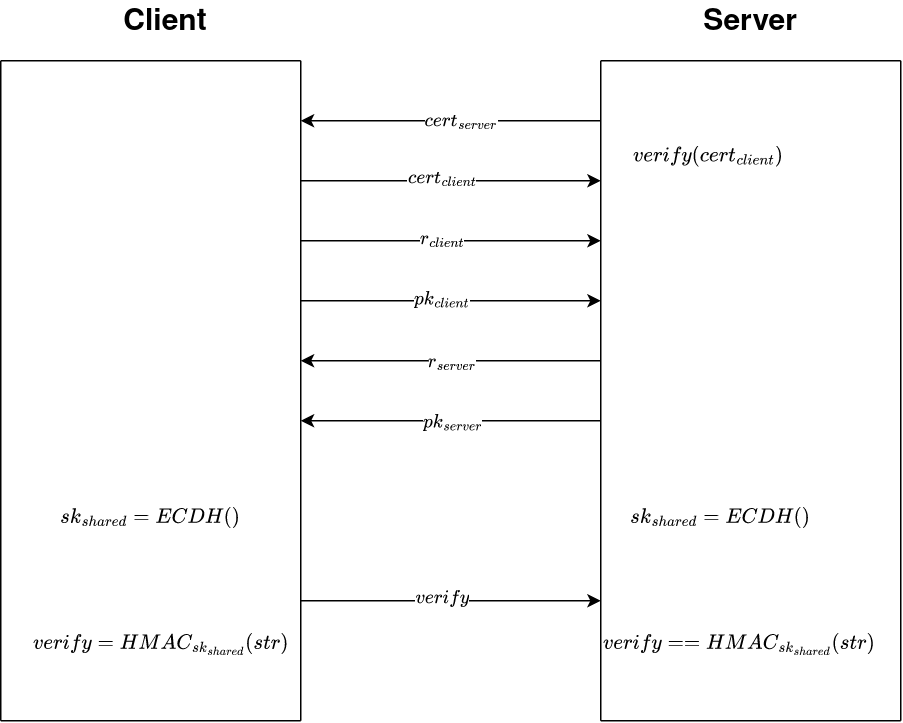
After exchanging these values, both sides calculates the shared secret using Elliptic-curve Diffie–Hellman (ECDH). For this challenge it suffices to know that ECDH is a primitive that can be used in order for two parties to securely calculate a shared secret.
Once both parties have calculated the shared secret, the server verifies that the client actually knows the secret by requesting an HMAC of the string: 'client myTLS successful! using the shared secret.
If the client fails to provide the correct values for the HMAC, the server will stop communication.
The rough overview of the protocol can be found in this drawing:
File storage functionality
Once the communication is established we can send encrypted messages to the server using the shared key. The server will then decrypt the messages and perform the requested command.
The main functionality can be summed up like this.
- Select a storage slot by providing a string (no validation is performed) in the format
/tmp/storage/[input] - Provide the content of the file you want to store
secret = input_encrypted(...) - The server hashes the previous file content and stores the value in a variable called
prev_hash - The server writes the provided content into the file, starting from the beginning of the file
f.write(secret) - The server sends the hash of the previous file to the client
| |
Now that we know what the server.py does where is the flag?
Flag placement
The server reads in the flag.txt and stores it in a variable called _FLAG and deletes flag.txt.
| |
The _FLAG variable is only used once again in the file while creating the hello message directly after the communication establishment was successful.
| |
The message is only send to the client if the certificate provided by the client identifies them as the admin 'CN=admin.mytls'.
Exploit
We can divide the exploit into 3 stages.
Overwrite other files
Upon examining the file storage functionality, it becomes apparent that the input provided is never checked for validity.
| |
In particular we can access files outside the storage folder by providing input like this:
| |
This input will evaluate to /usr.
With this in mind we can write to any file in the file system (which has the same permissions as the user how started server.py)
Exploit hash
Taking a look at the Dockerfile reveals the presence of server-ecdhkey.pem, which contains the server’s secret key.
If we could extract the files we would know the secret key of the server which is going to be quite helpful.
However, directly retrieving the file is not possible since we only receive SHA256 hashes of the files we want to access and not the content.
We can however overwrite the server-ecdhkey.pem and keep some of the original content since we open it in r+ mode and we start to write at the beginning of the file f.seek(0).
Consider, for example, a file with the following contents:
aabbccddee
By overwriting the first nine characters with 0 (or any value we choose) while keeping the last character e intact, we obtain:
000000000e
We receive the hashed value from the server server_hash = SHA256(000000000e) and since we know the first 9 bytes we only need to guess the last one SHA256(000000000?) which has 256 possible values (slightly fewer, given that the desired key comprises printable ASCII values).
server_hash != SHA256(000000000a)
server_hash != SHA256(000000000b)
...
server_hash == SHA256(000000000e) => Success! We guessed one byte of the file content
We can continue this process of byte-by-byte guessing until we have recovered the entire file.
SHA256(000000000?)
SHA256(00000000?e)
SHA256(0000000?ee)
...
SHA256(aabbccddee)
Since we can access the server-ecdhkey.pem file due to our ability to access any file, we can recover the private key of the server.
-----BEGIN PRIVATE KEY-----
MIGHAgEAMBMGByqGSM49AgEGCCqGSM49AwEHBG0wawIBAQQgodXSjxjUm89w/y6m
hRc9c7aOOYIgy5m4K++AXeErUKahRANCAARNWVuTXe/JBFanevD4MMlIDyZ8xXKz
nyUf63kGe9RBfFPek03cHJhEM5Fhe/1hHS2Jz2+R9zZWHd5gVYWFf2uC
-----END PRIVATE KEY-----
Compute shared secret
Now that we possess the secret key of the server server-ecdhkey.pem we can send any certificate as long as it is signed by the CA, even without knowing the private key.
But why is this possible?
In theory we need to know the secret key of the client certificate (in our case the admin private key), since otherwise we would not be able to compute the same shared secret (which we need in order to pass the HMAC check).
However, if know the secret key of the server, we can perform the same computations as the sever (since the server also does not know the secret key of the client) and compute the same shared secret.
With this knowledge, we can provide the admin certificate admin-ecdhcert.pem, any public key, and using the private key of the server server-ecdhkey.pem we pass the HMAC check and get the encrypted flag.
Now we just decrypt the flag using the shared secret we just computed and get:CTF{KeyC0mpromiseAll0w51mpersonation}